
UK Insulated Garden Rooms That Meet Building Regs from £18,000


An insulated garden room can give you comfortable, year-round living or working space, provided it’s built to proper thermal and ventilation standards. You get there via two routes: a DIY panel kit or a bespoke contractor-built room, each with different cost, performance and compliance trade-offs. Watch for one thing above all — adding sleeping accommodation changes the regulatory picture regardless of the room’s size. The next sections walk through how to choose between the two routes and what “properly insulated” actually means in practice.
TL;DR:
Installing proper continuous insulation in walls, roof, and floor is essential for year-round comfort and avoids thermal bridging issues common in summerhouses.
DIY panel kits are the most affordable but require precision sealing; modular prefab units offer better quality control but face transport restrictions, while bespoke builds are costlier and take longer but allow for detailed customization.
Meeting approved building regulation standards, especially regarding airtightness and ventilation, significantly enhances a garden room’s thermal performance and moisture control.
Costs range from about £8,000 for basic kits to over £18,000 for custom contractor-built rooms, with foundation and site access influencing final pricing and timescales.
Ensuring suppliers provide specific U-values and warranties, and clarifying who handles regulation compliance, helps avoid costly disputes or performance issues over the lifetime of the garden room.
Table of Contents
DIY kits, modular prefabs or a bespoke build: which route fits?
When do you need planning permission or building regs approval?
Who’s behind this guide, and how does EvoStruct approach garden rooms?
Which construction materials perform best for insulation and durability?
Should you build the kit yourself or hire a professional builder?
When does a kit make sense, and when should you call a builder?
How EvoStruct can help you build a compliant, warm garden room
What makes a garden room insulated, not just a summerhouse?
An insulated garden room is built around a continuous thermal envelope. That means insulation running unbroken through the walls, roof and floor, glazing specified for heat retention rather than just daylight, and a fixed heat source designed to run through winter. A summerhouse, by contrast, is usually a timber-framed shed with thin cladding and single-glazed windows. It’s fine for storing deckchairs or an afternoon read in June. It’s miserable in January.
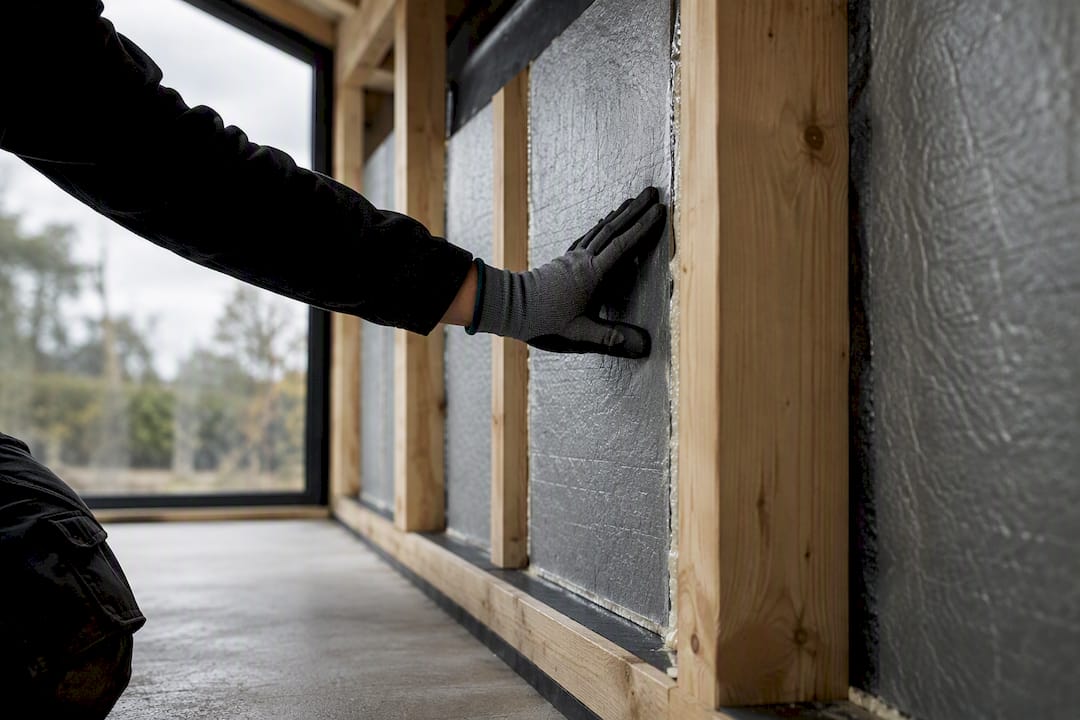
The distinction matters because marketing language in this sector is loose. Plenty of “insulated” log cabins on the market use timber walls that cannot get close to modern thermal targets without a serious retrofit, whatever the brochure implies. If a supplier can’t give you a U-value on request, treat the word “insulated” with suspicion — thickness of timber tells you very little about how the room performs in a cold spell.
What year-round use actually demands:
A fabric build-up (wall, roof, floor) engineered to hold heat, not just keep rain out
Double or triple glazing rated for thermal performance, not simply “double-glazed” as a marketing tick
A heating system sized for the room’s volume and glazing area, left running rather than switched on and off
Ventilation that manages moisture without undoing the insulation’s work
Electrics installed to current wiring standards, since a garden office running a laptop, monitor and space heater draws more than a garden shed ever will
Demand for this kind of space has grown alongside the shift to home working. ONS data on regional homeworking patterns shows a marked and lasting increase in people working from home, which has pushed many households towards a proper garden office rather than a corner of the spare room. The other common use case is a granny annexe style space, a gym, or a therapy room. Whichever you’re planning, the moment you introduce a bed or a shower, you’ve stepped into different territory for building regulations, something we’ll unpack further down.
DIY kits, modular prefabs or a bespoke build: which route fits?
Three build approaches dominate the UK market, and they suit genuinely different homeowners. Here’s how they stack up.
DIY panel kits. These arrive as pre-cut insulated panels (often SIPs or timber-frame with rigid insulation board) that you or a small local team bolt together on-site. They’re the cheapest entry point and the fastest to plan, since there’s no design process to work through. The trade-off is that performance depends entirely on how well the panels are jointed and sealed. Get the junctions wrong and you create thermal bridges that undermine the whole point of buying an “insulated” kit. Assembly typically needs at least two competent people and a weekend or two, longer if you’re not confident with power tools.
Modular or prefabricated rooms. Built substantially in a factory and delivered as large sections or a complete module, these give you tighter quality control than a DIY kit because the panels are assembled under cover, away from weather that can compromise insulation before it’s even fitted. Installation on-site is quick, often a day or two once foundations are ready. The constraint is transport: narrow side accesses, tight London terraces or awkward rear gardens can rule modular options out entirely, or add significant crane or access costs.
Bespoke contractor-built rooms. A builder designs and constructs the room on-site to your specification, integrating it with your existing services, matching materials to your house, and adjusting the layout to fit an irregular plot. This route costs more upfront and takes longer, typically several weeks rather than days, but it gives you the most control over insulation detailing, glazing position, and how electrics and drainage tie into the rest of the property.
Warranty and aftercare differ sharply across these routes too. Kit suppliers generally offer a product warranty on panels and glazing but leave installation defects as your problem, since you did the fitting. Modular suppliers usually bundle installation into the warranty, since their own team fits it. Bespoke contractors carry the most accountability: a reputable builder will warranty both materials and workmanship, and should remain on the hook for building control sign-off where it applies. If something goes wrong with insulation performance eighteen months in, it’s much easier to get it fixed under a contractor’s warranty than to argue with a kit manufacturer about your own assembly.
How much insulation and airtightness do you actually need?
Where full building regulations apply, Approved Document L sets the limiting standards for thermal performance, and it’s built around one core principle: continuity. Insulation has to run unbroken through the building envelope, with junctions between wall, roof and floor detailed to avoid thermal bridging, and the whole envelope has to meet airtightness targets rather than relying on gaps for ventilation. That’s the standard worth benchmarking against even for garden rooms that fall below the regulatory threshold, because a room that meets it will perform noticeably better in winter than one that doesn’t.
Airtightness and ventilation have to be considered together, not separately. Approved Document F governs ventilation, and the two documents are meant to work as a pair: seal the building tightly, then provide purpose-designed ventilation rather than relying on unintentional draughts to let stale air out. A room sealed well but ventilated badly is where condensation problems start.
Material choices for the insulation layer:
PIR (polyisocyanurate) board — high performance for its thickness, good where floor or roof depth is limited, but needs careful taping at joints to avoid gaps.
Mineral wool with a vapour barrier — cheaper per square metre and good acoustically for a soundproof garden studio, but performs poorly if the vapour barrier is damaged or badly lapped, letting moisture into the insulation.
SIPs (structural insulated panels) — insulation and structure combined in one panel, fast to erect and consistently high-performing if factory-made, though repairs or alterations later are trickier than with a stud-and-board wall.
Three details separate a genuinely warm, dry room from a cold, damp one. A warm roof build, where insulation sits above the structural deck rather than between rafters, avoids the cold bridging that plagues older “cold roof” designs and is now the standard specification for a serious garden room. An insulated base, laid on a damp-proof membrane (DPM) with insulation beneath the floor slab, stops heat leaching into the ground and keeps floors comfortable underfoot in winter. And insulated threshold treatments around doors matter more than people expect. Fitting new interior doors with proper seals and frames makes a measurable difference to energy retention, a point covered well in this guide to door specification and thermal performance — the same logic applies directly to garden room entrance doors, which are often the weakest point in an otherwise well-insulated build.
Pro Tip: Ask any supplier for the U-value of the complete wall build-up, not just the insulation board’s rating on its own. A panel with an excellent U-value can still leave you with a cold room if the frame, glazing and door aren’t specified to match.
Condensation is the most common complaint from owners of poorly ventilated garden rooms. Extract fans in a shower room or kitchenette, trickle vents in window frames, and in higher-spec builds a mechanical ventilation with heat recovery (MVHR) unit, all reduce the risk of moisture building up inside a well-sealed room. Skipping ventilation to save money on an otherwise well-insulated room is a false economy: you’ll trade a cold room for a damp one.
Which heating and electrical setup suits year-round use?
The right heating choice depends on how often you’ll use the room and how well insulated it already is. A tightly sealed, well-insulated garden room needs far less heating capacity than people assume, but the system still has to be sized properly and installed to current standards.
Heating options worth comparing:
Electric panel convectors — cheap to buy and install, fine for occasional use, but relatively costly to run all day for a full-time home office.
Electric radiators — a step-up in comfort and more even heat distribution, still simple to wire in.
Underfloor heating — comfortable and unobtrusive, best specified at the build stage since retrofitting into an existing floor is disruptive.
Air-source or split heat-pump units — higher upfront cost, but the most efficient option for daily year-round use, especially in a room already built to a good U-value.
Any new electrical circuit for a garden room counts as notifiable work under Part P of the Building Regulations, even when the room itself is exempt from full building-regs approval by size. That means the work must be carried out by a competent, registered electrician or formally notified to building control. This trips up a fair number of DIY kit builders who assume that because the structure doesn’t need sign-off, the wiring doesn’t either. It does. Running a new circuit from the house consumer unit is exactly the kind of work Part P is designed to catch.
Plumbing follows a similar logic but with its own triggers. Adding a WC or shower to a garden room brings drainage and water supply into play, and depending on how the waste connects to existing drainage, that can pull the whole project into a fuller building-regs conversation even if the room’s floor area alone would have kept it exempt. If you’re planning anything beyond a hand basin, raise it with your contractor or building control at the design stage rather than after the slab is poured.
Ventilation strategy has to work alongside heating, not against it. A well-heated room with no purpose-provided ventilation traps moisture from occupants, laptops, and hot drinks, which is precisely the condition that breeds condensation on cold glazing and, eventually, mould in corners. Trickle vents and extract fans cost very little at the build stage compared with fixing damp problems later.
When do you need planning permission or building regs approval?
Most garden rooms sit within permitted development and don’t need planning permission, but that’s a separate question from whether building regulations apply, and confusing the two causes most of the disputes homeowners run into.
On planning, the Planning Portal’s guidance on outbuildings is clear that permitted development covers structures used incidentally to the enjoyment of the main house, things like a home office, gym, or hobby room. It excludes self-contained living accommodation. The moment a garden room includes a kitchen, bathroom and bedroom functioning as an independent dwelling, it’s no longer incidental use and generally needs full planning permission. Additional technical guidance sets further limits on height, eaves and proximity to boundaries, and different rules apply on designated land or with listed buildings, so it’s worth checking your specific plot rather than assuming the general rule applies.
Building regulations run on a separate set of thresholds, based on floor area and use:
Under 15 m² — normally exempt from building regulations approval entirely, provided there’s no sleeping accommodation.
15 to 30 m² — conditionally exempt, but only if the room sits at least 1 metre from any boundary, or is constructed from substantially non-combustible materials, and again only with no sleeping accommodation.
Over 30 m² — requires full building regulations approval regardless of materials, siting or intended use.
Roughly a third of the exemption threshold band (15 to 30 m²) hinges entirely on that 1 metre boundary distance or non-combustible construction, which is why so many garden room disputes come down to exactly where the room sits on the plot.
These thresholds come from LABC’s guidance on outbuildings, and the same source underlines a point worth repeating: sleeping accommodation triggers building regulations regardless of size. A 12 m² room with a bed in it isn’t automatically exempt just because it’s under 15 m². Industry guidance aimed at builders and homeowners tends to summarise this as the “30 m² rule”, but that shorthand can mislead people into thinking size is the only variable. It isn’t.
If you’re at all unsure where your project sits, two practical steps help avoid a costly dispute later. Apply for a Lawful Development Certificate (LDC) if you want written confirmation that your project doesn’t need planning permission, useful if you plan to sell the house and want a clean paper trail. And even where you believe your project is exempt from building-regs approval, contacting your local building control team early costs nothing and can save you from a retrospective enforcement headache if your assessment turns out to be wrong.
What does an insulated garden room cost?
Three broad price bands cover most of the UK market, and each includes a genuinely different level of specification.
Basic insulated kits start around £8,000 to £15,000 for a small to mid-size room. This typically covers the structure, basic double glazing and standard insulation, but often excludes foundations, electrics, decoration and any groundworks, all of which you’ll need to budget separately.
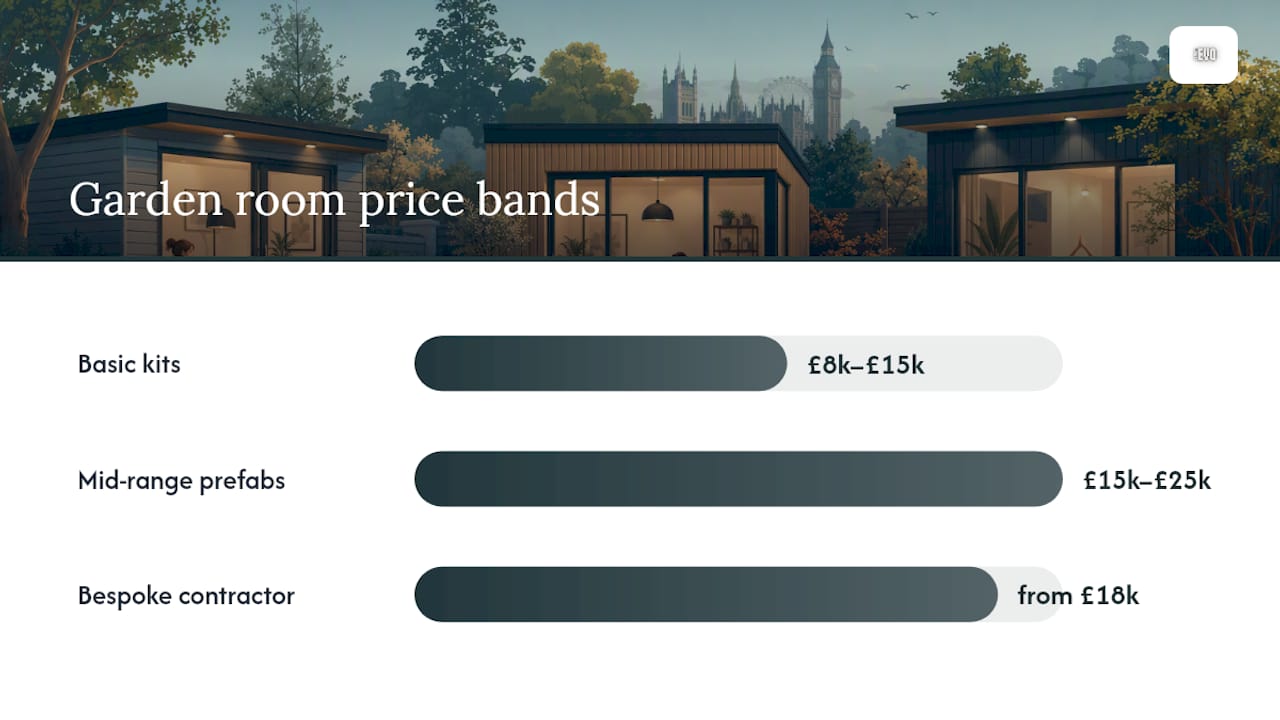
Mid-range prefab units run roughly £15,000 to £25,000, usually including a better-specified thermal envelope, factory-fitted electrics ready for final connection, and sometimes basic plumbing provision. Installation and foundations are more often bundled in at this tier, though it’s worth checking exactly what’s quoted.
Bespoke contractor-built rooms start from around £18,000 and can run considerably higher depending on size, glazing specification and finish. EvoStruct’s garden room service begins at this level, covering design, foundations, insulation specification, electrics and finishes as a single fixed-price package rather than a series of separate line items you have to coordinate yourself.
The main variables that push a quote up or down are foundations (a sloped or poor-draining garden costs more to prepare), the extent of electrical and plumbing work, glazing area and specification, internal finishes, and site access. A garden with narrow rear access for materials delivery, or a plot requiring significant groundworks before any building starts, adds cost that a straightforward flat, accessible garden won’t.
Ways to keep the budget under control:
Get a proper site survey before accepting a quote, since ground conditions materially affect foundation cost.
Insist on a fixed-price quote rather than a rough estimate with “subject to survey” caveats buried in the small print.
Build in a contingency of around 10% for unforeseen groundworks or service connections.
Clarify in writing who is responsible for building control notification and sign-off before work starts, not after.
Timescales track roughly with cost tier. Basic kits can be assembled in a few days once foundations are ready. Mid-range prefabs are often installed within a week of delivery. Bespoke builds typically take four to eight weeks from groundworks to handover, depending on the complexity of services and finishes.
How do you choose between a kit supplier and a builder?
Choosing well comes down to checking the right things before you sign anything, not just comparing headline prices.
Verify insurance and track record. Ask for proof of public liability insurance, and ask to see completed projects, ideally ones you can visit or view remotely. A builder confident in their work has nothing to hide here.
Read the warranty terms closely. Understand exactly what’s covered, for how long, and whether it covers workmanship as well as materials. A kit supplier’s product warranty won’t help you if your own assembly caused the leak.
Clarify who handles regulatory paperwork. Find out upfront whether the supplier or contractor deals with building control notifications and inspections, or whether that responsibility sits entirely with you.
Get specifics on technical performance. Ask directly for wall, roof and floor U-values, whether airtightness has been tested, and what their strategy is for preventing condensation.
Nail down the contract scope. A fixed scope of works, staged payment milestones tied to progress rather than time, and clear responsibility for sign-off should all be in writing before any deposit changes hands.
Red flags worth walking away from include vague verbal promises about “insulation included” with no U-value offered, requests for a large deposit before any design or survey work, and reluctance to put warranty terms in writing.
Pro Tip: If a quote seems significantly cheaper than everything else you’ve compared, ask specifically what’s excluded rather than assuming it’s simply a better deal. Foundations, electrics and building control fees are the three items most often quietly left off a “too good to be true” price.
Who’s behind this guide, and how does EvoStruct approach garden rooms?
This guide draws on UK building regulations guidance, planning policy and construction-industry insulation standards to give homeowners a compliance-first view of what a genuinely year-round garden room requires. It’s written from a construction perspective rather than a marketing one, which is why it leans on U-values and regulatory thresholds rather than vague claims about warmth.
EvoStruct approaches garden room projects the same way it approaches loft conversions and extensions: design first, compliance checked early, and quality assurance built into the process rather than bolted on at the end. That includes specifying insulation to a defined U-value rather than a vague “well insulated” promise, checking planning and building-regs status before any groundworks begin, and giving clients live virtual tours of active projects so you can see workmanship in progress before committing. If you’d like to see specific case studies, testimonials or project metrics for garden room builds, EvoStruct can provide these on request during an initial enquiry.
How long does an insulated garden room actually last?
A well-built insulated garden room should last several decades with sensible upkeep, but longevity depends heavily on how the original build handled moisture, not just how thick the walls are.
Timber-framed rooms need their external cladding checked and re-treated or repainted every few years, since UV and rain exposure degrade timber finishes faster outdoors than on a house wall sheltered under deep eaves. Roofing membranes and flashings, particularly around a warm roof build-up, are worth a visual check annually, since a small leak in a warm roof can sit unnoticed inside the insulation layer for months before symptoms show inside the room.
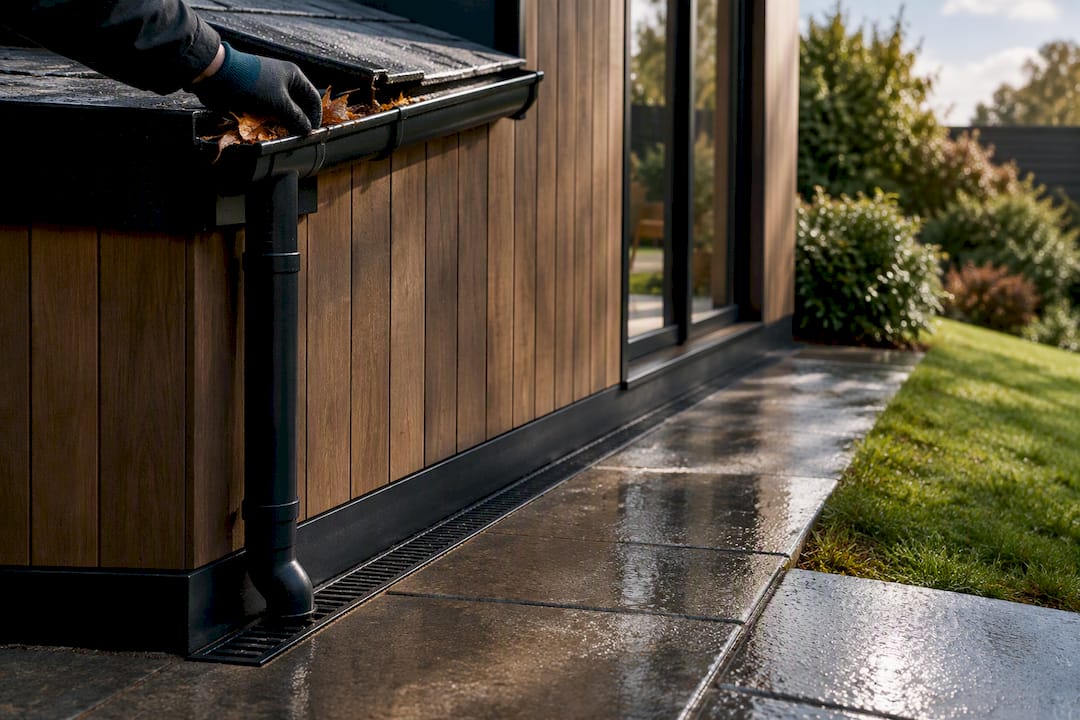
Guttering and drainage around the base matter more than most owners expect. Standing water against a timber-clad wall or a poorly sealed base is the single biggest cause of premature rot and insulation failure in garden rooms, far more common than any fault in the insulation material itself. Keeping gutters clear and ensuring the ground slopes away from the structure costs nothing and prevents a great deal of expensive remedial work.
Glazing seals and door thresholds are the other wear point. Rubber seals around double-glazed units and door frames degrade over time, and a failed seal quietly undoes a chunk of the room’s thermal performance long before it becomes obvious as a draught. Checking seals every couple of years, and budgeting to replace them if they’ve hardened or cracked, keeps a well-specified room performing as designed for its full lifespan rather than slowly drifting back towards summerhouse performance.
Which construction materials perform best for insulation and durability?
Material choice affects both how warm the room feels and how long it lasts, and the two don’t always point in the same direction.
Timber frame with rigid insulation board is the most common approach for bespoke and kit-built rooms alike. It’s flexible to build with, insulates well when detailed properly, but is only as durable as its weakest cladding and requires ongoing maintenance to keep moisture out of the frame.
SIPs (structural insulated panels) combine structure and insulation in a single factory-made panel, giving consistent thermal performance with fewer of the gaps that cause thermal bridging in site-built walls. They’re generally more durable against moisture ingress than a poorly detailed timber frame, since the insulation core is sealed at manufacture rather than assembled on a wet building site.
Steel-framed construction, more common in larger bespoke or commercial-adjacent builds, offers strong structural durability and resistance to warping, but needs careful thermal break detailing at the frame to avoid cold bridging, since steel conducts heat far more readily than timber.
Render or brick-clad finishes over an insulated frame give a more house-like appearance and strong weather resistance, at a higher cost than timber cladding, and are a common choice for bespoke rooms designed to match the main house’s external finish.
No single material wins outright. Timber frame suits budget-conscious kit builds and gives good performance if the detailing is right. SIPs suit anyone prioritising consistent thermal performance with less on-site risk. Bespoke contractors will typically recommend whichever combination best matches your garden’s conditions, your budget, and how closely you want the room to visually match your house.
Are there efficiency certifications you should look for?
Garden rooms don’t carry a dedicated efficiency certification scheme of their own, unlike new-build houses, which is part of why claims about insulation performance vary so widely between suppliers.
Where a garden room falls under full building regulations, either because it exceeds 30 m² or includes sleeping accommodation, the fabric has to meet the U-value targets and airtightness principles set out in Approved Document L. That’s the closest thing to an official efficiency standard applicable to these structures, and building control sign-off is your confirmation that the room actually meets it, rather than simply claiming to.
For garden rooms that fall below the regulatory threshold and therefore don’t need formal sign-off, there’s no compliance certificate to check. That puts the burden back on you to ask suppliers directly for U-values on walls, roof, floor and glazing, and to treat Approved Document L’s targets as the benchmark worth matching even when you’re not legally required to. A reputable contractor will happily quote these figures. A supplier who can only offer timber thickness or a vague “fully insulated” claim, without numbers, is one to question closely.
Should you build the kit yourself or hire a professional builder?
DIY kits and professional builds carry genuinely different risk profiles, and the right choice depends on your own skills, your garden’s layout, and how much long-term performance you’re willing to gamble on.
DIY kits save money upfront, often several thousand pounds compared with a bespoke build, and give you full control over the timeline. The risk sits entirely in the assembly. Poorly sealed panel joints, gaps in the insulation layer, or a badly laid damp-proof membrane won’t necessarily be visible at handover, but they’ll show up as cold spots, draughts or damp within a year or two. If you’re confident with tools and have genuinely flat, accessible ground, a kit can work well. If either of those is in doubt, the savings can evaporate fast once you’re paying someone else to fix a problem you created.
Hiring a professional builder costs more but shifts that risk onto someone contractually accountable for the outcome. A competent contractor handles foundations, insulation detailing, electrics and building control notification as part of one coordinated process, rather than leaving you to coordinate trades and hope the junctions between them are sealed correctly. The quality ceiling is also higher: a bespoke build can be tailored to an awkward plot in ways a standardised kit simply can’t match.
The honest trade-off is upfront cost against long-term certainty. A kit can be excellent value if you get the detailing right. A professional build costs more but removes the guesswork on the details that actually determine whether the room stays warm and dry for the next twenty years.
When does a kit make sense, and when should you call a builder?
A DIY kit suits a small, occasional-use room on a flat, easily accessible plot where you’re comfortable with careful detailing around joints and seals. Anything intended for daily use, an awkward or sloping garden, or a room where sleeping accommodation or plumbing might come into play, calls for a contractor from the outset.
The lifecycle argument is simple: correct insulation and moisture detailing at the build stage costs far less than retrofitting a cold, damp room years later. If you’re weighing up your options, a site survey or a quick quote will tell you more about your specific plot’s constraints than any general guide can.
— Florin
How EvoStruct can help you build a compliant, warm garden room
EvoStruct’s approach to garden rooms follows the same design-and-build model used across its loft conversions and extensions in Greater London and Yorkshire: one team handling design, compliance checks, insulation specification and construction, rather than you coordinating separate trades and hoping the junctions between their work are sealed properly.

An initial enquiry typically starts with a site survey to assess ground conditions and access, followed by a check of planning and building-regs status specific to your plot and intended use, and a fixed-price quote delivered within 24 hours of that survey. That speed matters when you’re comparing several options and don’t want to wait weeks for a number to plan around. EvoStruct also gives clients access to live virtual tours of active projects, so you can see real workmanship and site management before committing, rather than relying on brochure photos alone.
Garden room pricing through EvoStruct starts from £18,000, covering design, foundations, insulation and finishes as one package. If you’re also weighing up a wider home extension or a loft conversion alongside a garden room, EvoStruct’s residential building services page covers the full range. Request a site survey to get a fixed quote for your specific garden and requirements.
Sources
FAQ
Are insulated garden rooms any good?
Yes, when built to a proper thermal specification with continuous insulation, decent glazing and fixed heating, an insulated garden room performs comfortably through winter and summer alike. The quality gap sits between suppliers, not the concept itself, so checking actual U-values matters more than the word “insulated” on its own.
What is the average cost of an insulated garden room in the UK?
Basic insulated kits typically start around £8,000 to £15,000, mid-range prefab units run roughly £15,000 to £25,000, and bespoke contractor-built rooms start from about £18,000 through providers like EvoStruct. Foundations, electrics and site access all affect where you land within these bands.
Can you insulate a garden room?
Yes, an existing uninsulated cabin or summerhouse can usually be retrofitted with insulation board or mineral wool in the walls, roof and floor, though results depend heavily on how much of the structure is accessible without stripping it back. It’s rarely as effective, or as cheap, as specifying proper insulation at the build stage.
Can you legally sleep in a garden room?
You can, but adding sleeping accommodation triggers full building-regulations requirements regardless of the room’s floor area, even below the usual 15 m² exemption threshold. If you’re planning a garden room as a bedroom or self-contained annexe, involve building control at the design stage rather than after construction.
Recommended

Comments